Oct 19, 2026 | Beyond the Blueprint
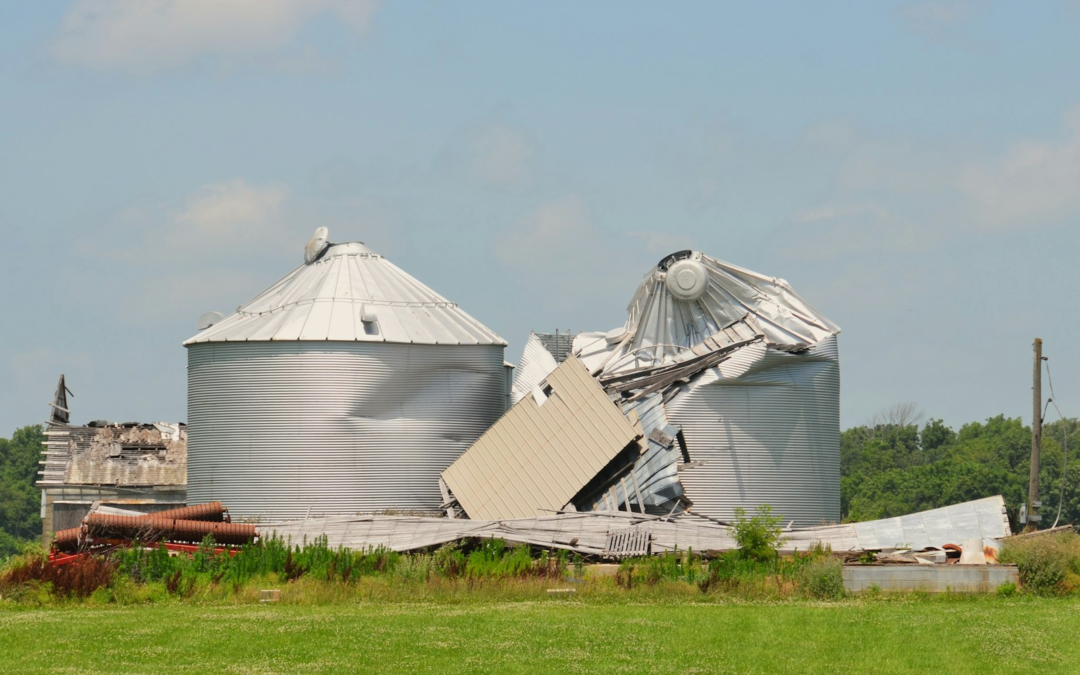
Farm buildings carry real structural loads and are easy to overlook. A machine shed, a free-stall barn, a grain bin or an older timber-frame barn all move roof, wind and equipment loads through long spans and light framing, and they usually keep doing it quietly for a long time. That makes it easy to miss the point at which something has changed.
This is a look at what makes agricultural structures different, what is worth an engineer’s attention, and when a licensed structural engineer should be involved. Curva Consultants works on agricultural facilities for owners, contractors and architects in Green Bay, Manitowoc and the surrounding area.
What Makes a Farm Building Structurally Different
Most farm buildings are built for clear span. The point of the building is the open floor, so the framing is designed to carry roof and wind load across a long distance with as little in the way as possible. Post-frame construction, light-gauge steel trusses and wide-spaced purlins all do that efficiently, and all of them depend on every part of the assembly doing its share.
Three things follow from that. The first is that the load path is less forgiving than in a building with interior walls — remove or modify one element and there is often nothing nearby to pick up the load. The second is that bracing matters more than it looks like it should; the diagonal members and the sheeting are often part of how the building resists wind rather than simply cladding it. The third is that farm buildings often change use over their life, and the framing rarely changes with them.
Wisconsin Conditions That Act on Agricultural Structures
Northeast Wisconsin puts a particular set of demands on a long-span building. Snow is a dominant consideration for a wide, low-slope roof, because such a roof collects snow across its whole area and wind then redistributes it — drifting against a taller adjacent building, piling in a valley between two roof sections, or loading one side of a ridge more than the other. Lake-effect precipitation off Lake Michigan adds moisture that makes accumulated snow heavier than its depth suggests.
Freeze-thaw cycling works on anything holding water: concrete piers, slab edges, bin foundations and the bases of posts set in or near grade. Clay soils through much of the region swell when wet and shrink when dry, which moves shallow foundations seasonally. A high spring water table adds to that, particularly around structures built on low ground. And because a farm building is often the tallest thing standing alone in an open field, it takes wind with no shelter at all, including on large doors and open sidewalls where the pressure acts on the frame directly.
Signs Worth an Engineer’s Attention
Some of these are gradual and some appear after a single event. All of them are reasons to have the structure looked at rather than watched:
- Roof purlins or trusses that have begun to sag, twist or separate at a connection
- Posts that have moved, rotted at grade, or are no longer plumb
- New or widening cracks in a slab, pier or bin foundation
- Doors or large openings that have gone out of square
- Rust at the base of steel columns or at truss connection plates
- Bracing that has been cut, removed, or never reinstalled after earlier work
- Standing water against a foundation, or grade that has changed around the building
- Visible deflection in a roof after a heavy snow that does not recover once the snow is gone
If a building is actively moving, making noise or shedding material, the first call is to emergency services. Keep people and equipment away from it until it has been looked at.
Adding Equipment, Storage or a Platform
A practical question on a working farm is whether a building can take something new. Hanging a conveyor or a feed line from the roof framing, setting a tank or a motor on an existing slab, adding a mezzanine or a work platform, or stacking material higher than the building was designed for are all changes in load, and the framing was sized for the loads it was originally given.
Mezzanine and platform work and machinery support are both services Curva Consultants provides. The question an engineer answers is not only whether the building can carry the new weight but where that weight goes — which members see it, how it reaches the foundation, and what has to be added or reinforced along the way. That analysis is what produces stamped drawings a contractor can build from. The difference between dead load and live load is worth understanding before that conversation.
Changing What a Building Is Used For
Converting an older barn to equipment storage, turning part of a shed into a shop, finishing a space for people rather than machinery, or putting a different commodity in a bin all change the demands on the structure. A floor rated for foot traffic is a different thing from a floor carrying a loaded skid steer. A building holding dry equipment is a different thing from one holding material that pushes outward on the walls.
A change of use is also usually the point at which a building department becomes involved, and an assessment of proposed modifications to the structure is generally what it asks for. Doing that analysis before the work is designed is simpler than doing it afterward.
After Wind, Snow or Impact Damage
Farm buildings take damage in ways that are not always visible from the ground. Wind can loosen connections without moving cladding. A heavy snow can overload a truss that then looks close to normal once the roof clears. Impact from a loader, a tractor or a vehicle can bend a column near its base where nobody looks.
Curva Consultants performs forensic structural investigation, including damage from natural disasters — wind, snow, rain and flooding — along with freeze/thaw damage, impact from a forklift, crane or passenger vehicle, and overload assessment. Insurance claim support is part of that work, though the firm is not a claims adjuster. What to document after storm damage covers what is worth recording before anything is cleaned up, and snow load on Wisconsin roofs goes further into the seasonal side of it. Forensic engineering describes how that work is handled.
What a Structural Evaluation Involves
A visit starts with the building as it stands: framing type and spacing, span, connection condition, bracing, foundation and grade, and whatever has been changed since it was built. Measurements matter, because small amounts of movement are difficult to judge by eye. Where the original drawings exist they are worth finding; where they do not, the structure itself is the record.
What comes out of it is a written report describing what was observed, whether anything appears to be moving, and what is recommended. Where a repair or a modification needs engineering, that arrives as calculations and stamped drawings a contractor can work from. The design is the engineer’s work; carrying out the repair is the contractor’s. Foundation inspection in Green Bay and Manitowoc describes the same process where a foundation is the focus.
How This Differs From Other Inspections
A structural evaluation is not a home inspection, and Curva Consultants does not perform home inspections. It is also not a general property or equipment inspection, a soils investigation, or a code compliance review of an entire facility. It is an engineering assessment of how the structure carries load and what condition the load-carrying parts are in. Where a soils investigation is needed, that is separate work, and the report will say so.
Permits and the Building Department
Requirements for agricultural buildings vary by jurisdiction, and they vary with what the building is used for. The local building department is the right place to ask what applies to a specific property, and it generally asks for drawings and calculations stamped by a licensed engineer where a structural modification is involved. Structural drawings and calculations for a building permit covers what that submittal usually includes.
Working With Curva Consultants
The principal engineer at Curva Consultants holds Wisconsin PE License No. 47224 and works directly with owners, contractors, architects and building departments on agricultural facilities, mezzanine and platform work, machinery support, and forensic investigation. To arrange an evaluation, call 866-455-0155 or use the contact page. The projects and services page lists the full range of work.
Curva Consultants serves Manitowoc, Downtown Green Bay, Green Bay’s East Side, De Pere, Ashwaubenon, Suamico, Howard, Allouez, the Appleton area and the Sheboygan area.
Oct 12, 2026 | Beyond the Blueprint
A foundation carries everything above it, so when something changes down there the signs usually show up somewhere else first. A door that will not latch. A new crack running up from a basement wall. A floor that feels like it slopes toward one corner. Owners in Green Bay and Manitowoc often live with signs like these for a while before deciding that someone should look at the foundation itself.
This article covers what a foundation inspection involves when a licensed structural engineer performs it, what sorts of conditions call for one, and what you are holding at the end of it. The principal engineer at Curva Consultants holds Wisconsin PE License No. 47224 and evaluates foundations for residential and commercial buildings across northeast Wisconsin.
When a Foundation Is Worth a Closer Look
Not every crack means something. Concrete shrinks as it cures, and fine hairline cracking in a basement wall is often just that. What matters more is whether something is still moving, and whether the pattern points at the structure rather than at the finishes.
Conditions that generally warrant an engineering evaluation:
- Cracks that have widened, lengthened or opened further since you first noticed them
- A foundation or basement wall that leans, bows inward or has shifted sideways
- Stair-step cracking through block or brick, particularly near a corner
- Floors that slope, or interior doors and windows that bind in more than one room
- Separation where a porch, stoop, addition or garage slab meets the main building
- Water entering through a crack that used to stay dry
- A purchase, an addition or a change of use where the existing foundation would have to carry more than it does now
Two of these together say more than any one alone. Cracking plus a floor that has gone out of level usually means the ground under part of the building is behaving differently from the ground under the rest of it. Our earlier articles on when a foundation crack is worth worrying about and on telling cosmetic cracking apart from structural movement go further into reading the cracks themselves.
What a Foundation Inspection Involves
Most of the work is observation and measurement, done in an order that builds a picture rather than chasing the first thing that looks wrong.
It usually starts with whatever record exists: original drawings if there are any, past repair work, permit history, and what the owner has watched change over time. That last part is often the most useful thing available, because it is the only evidence of movement over a span of years.
From there the evaluation moves outside and then in. Outside, the grade around the building, the drainage, the downspout discharge, settlement in adjacent slabs and walkways, and the condition of exposed foundation wall all get looked at. Inside, the basement or crawlspace walls, the slab, columns and posts, beams, the framing bearing on the foundation, and the places where loads from above come down into it.
Measurement matters here, because small amounts of movement are difficult to judge by eye. Floor levels get measured across the whole building, walls get checked for plumb, and crack locations and widths get recorded so there is a baseline to compare against later. Where it is not yet clear whether movement is active or finished, the sensible recommendation is often monitoring over a period of months rather than repair work now.
Where the question turns out to be about the soil under the building rather than the structure sitting on it, a soils investigation may be the right next step, and the report will say so.
How This Differs From a Home Inspection
These two get mixed up, and the difference matters when you are deciding who to call. A home inspection is a broad survey of an entire property, covering roof, mechanical systems, electrical, plumbing and visible condition throughout, usually inside a real estate transaction and on a schedule measured in hours.
A structural foundation evaluation is narrow and deep. It looks at one question, in engineering terms, and answers it in writing under a professional seal: what is happening to this structure, what it likely means, and what should be done about it. Curva Consultants does not perform home inspections. The work here is structural engineering, and it is the kind of follow-up a general inspection can point toward when something in the foundation falls outside its scope.
The same holds for repair work. The evaluation identifies what is wrong and what the structure needs; carrying out the repair is a contractor’s work, performed from the engineer’s recommendation and, where the repair is structural, from stamped drawings.
Wisconsin Conditions That Act on Foundations
Foundations in this part of the state are worked on by the weather and the ground in ways that a building in a milder climate never experiences.
Freeze and thaw is the main one. Water in the soil beside a foundation wall expands when it freezes and pushes against that wall, then releases when it thaws, and the cycle repeats through the winter and again in spring. A wall that was only slightly out of plumb at the start of a winter can be measurably further over by spring. The same cycling works on the concrete itself wherever water has found its way into a crack.
The soils matter just as much. Much of northeast Wisconsin sits on clay, which swells as it takes on water and shrinks as it dries. A building partly on clay and partly on something firmer tends to move unevenly, which is where stair-step cracking and sloping floors come from. Lake-effect precipitation off Lake Michigan and a high water table during spring melt both add water to that cycle, and poor drainage at the building concentrates it in the worst possible place.
Drainage is the one part of this an owner can usually act on. Downspouts discharging at the base of a wall, grade that falls toward the building instead of away from it, and a window well with nowhere to drain all put water where it does the most work. None of that fixes a wall that has already moved, but it reduces the chance of the same thing happening again after a repair.
What You Receive Afterward
The deliverable is a written report. It sets out what was observed, what those observations indicate, whether anything is actively moving, and what is recommended. That recommendation can be no action, continued monitoring, a drainage correction, or structural repair with drawings and calculations to carry it out. Where repair design is called for, the drawings carry the engineer’s Wisconsin seal, which is what a building department generally asks for before issuing a permit.
A report can also be written for an audience beyond the owner. If the question is what caused damage rather than only what condition the building is in now, that is forensic engineering work, and the report is prepared with that use in mind. Our firm investigates damage from natural disasters including wind, snow, rain and flooding, freeze and thaw damage, impact, and overload, and provides insurance claim support. Our article on hiring your own structural engineer for an insurance claim covers how that works from a building owner’s side. Our firm is not a claims adjuster, and coverage decisions stay with the insurer and the owner.
When to Call Without Waiting
Most foundation questions can wait for an appointment. A few cannot. If a wall is visibly moving, if there is audible cracking, if a floor has dropped, or if a foundation wall has rotated or collapsed inward, leave the building and call 911 or the fire department. Those are the situations where the structure may not be carrying what it is supposed to be carrying, and the first priority is people rather than documentation.
Short of that, do not excavate against a leaning wall, do not add fill or load beside a foundation that is already moving, and do not enter a crawlspace where framing is visibly distressed. Removing soil from one side of a wall that is already under pressure from the other side changes the loading on it in a way that is difficult to predict from the surface.
Foundation Inspections in Green Bay and Manitowoc
Curva Consultants evaluates foundations for houses, apartment and condominium buildings, commercial and retail buildings, agricultural facilities and local government buildings throughout northeast Wisconsin. If you are weighing whether what you are seeing is worth an engineer’s time, a conversation about what you have noticed is usually enough to tell. Call 866-455-0155 or use the contact page, and see our services for the full range of structural work. For what a site visit looks like more generally, see structural engineer inspections in Green Bay and Manitowoc.
Service areas include Manitowoc, Downtown Green Bay, Green Bay East, De Pere, Ashwaubenon, Allouez, Howard, Suamico, the Appleton area and the Sheboygan area.
Oct 5, 2026 | Beyond the Blueprint
After a storm passes, the first instinct is to clean up. Haul off the branches, sweep up the glass, get a tarp over the hole, call someone to put things back the way they were. That instinct is reasonable, and on a damaged building it can quietly work against the owner. Once debris is moved and repairs begin, the evidence of what actually happened starts to disappear — and the record of the damage is often what an insurer, an adjuster or an attorney relies on months later.
Documenting storm damage well does not take special equipment. It takes a few minutes of deliberate effort at a moment when nobody feels like being deliberate. This article walks through what is worth recording, why it matters later, and which kinds of damage call for a licensed structural engineer rather than a camera.
Safety Comes Before Any Documentation
Nothing below is worth a risk. If a wall is leaning, a roof is sagging, a floor feels soft underfoot, you hear cracking or popping, or you smell gas, leave the building and call 911 or the fire department. The same goes for standing water near electrical panels and for any downed line, which should be treated as live.
Do not climb onto a damaged roof, and do not go into an attic or crawlspace under a damaged area. Photographs from the ground, from a window, or from a neighbor’s property are worth far more than a photograph taken from somewhere unsafe. If part of the structure is unstable, documentation waits until someone qualified has looked at it.
What to Record, and in What Order
The goal is a record that someone who was not there can follow. Three layers do most of the work.
Wide shots that establish context
Start outside and photograph each elevation of the building from far enough back that the whole wall and roofline are in frame. Include the surroundings — the fallen tree, the direction debris travelled, the neighboring structures. These wide shots are what later tie a specific crack to a specific event, and they are the easiest ones to skip in favor of close-ups.
Close-ups of each individual area of damage
Then photograph each damaged area on its own: the separated siding, the lifted shingles, the cracked masonry, the bent gutter, the broken window, the water stain on the ceiling. Take more than feels necessary. Put something in frame for scale when the size of a crack or a gap matters — a tape measure, a coin, a pen laid alongside it.
Interior conditions, including the parts that look minor
Go room by room inside. Photograph water staining, new cracks at the corners of door and window openings, doors and windows that have started to stick or will no longer latch, separations where walls meet ceilings, and any sloping or springiness in a floor. Interior signs are frequently the ones that point to a structural problem rather than a surface one, and they are the easiest to paint over before anyone has recorded them.
Alongside the photographs, write a few things down the same day while they are still accurate:
- The date and roughly the time the weather occurred, and when the damage was first noticed
- What the conditions were — wind, hail, heavy rain, heavy wet snow, flooding
- Which areas were already in poor condition before the storm, described honestly
- Anything that was moved, covered, pumped out or torn out as an emergency measure, with photographs taken before that work if at all possible
- Names and dates for everyone who has looked at the building, including contractors
Keep receipts for emergency measures such as tarping, boarding or water extraction, and keep the damaged materials that get removed if there is anywhere to put them. A box of broken fasteners or a cut section of a damaged member is a far better record than a description of one.
Why the Record Matters Later
Storm damage claims usually turn on two questions: what the condition of the building is now, and whether the storm is what caused it. Both are easier to answer with photographs taken the same week than with memory and a repaired building.
Pre-existing condition is where the record matters most. A crack that was there last year and a crack that opened during a wind event can look identical in a photograph taken after repairs have started. If there are older photographs of the building — listing photos, a previous inspection, even family pictures taken in the yard — they are worth finding and keeping with the new ones. Documenting honestly, including the parts that were already worn, tends to make the rest of the record more credible rather than less.
Our firm offers insurance claim support as part of its forensic engineering work. The principal engineer is not a claims adjuster and does not determine what a policy covers; what an engineer can provide is an independent evaluation of the structure and an opinion on cause, documented in a form that an adjuster, an owner or an attorney can work from. If you are weighing whether to bring in your own engineer rather than relying solely on one sent by an insurer, that question is covered in more detail here.
Wisconsin Conditions That Complicate the Picture
Northeast Wisconsin puts a particular set of loads on buildings, and they interact in ways that make single-event damage harder to read.
Wind coming off Lake Michigan arrives at exposed walls and roof edges with little to slow it down, and lake-effect snow can load one side of a roof far more heavily than the other as it drifts against parapets, mechanical units and changes in roof height. Heavy wet snow followed by a thaw and a hard refreeze drives water into joints that were sound in October. Freeze-thaw cycling then works on that water all winter, widening masonry joints and spalling concrete a little more each year. Underneath, the clay soils common in the region swell and shrink with moisture, and a high spring water table pushes on foundation walls that are already carrying their normal load.
The practical consequence is that a crack discovered after a storm may have three contributing causes, only one of which is the storm. That is not a reason to skip documentation — it is the reason documentation has to be specific about dates and conditions. Roof loading in particular is worth understanding before winter; what to watch for on Wisconsin roofs is covered separately, as is how extreme weather affects buildings more broadly.
Damage That Calls for a Licensed Structural Engineer
Photographs record a condition. They do not tell an owner whether the building is still carrying its loads the way it was designed to. These are the situations where a structural evaluation is the appropriate next step rather than a repair plan:
- Any visible deflection, sagging or leaning — a roof line that has changed, a wall out of plumb, a beam that has dropped
- New cracks in foundation walls, in masonry, or in concrete that are wide, stepped, or running diagonally from openings
- Cracks that are still moving, or that reopen after being patched
- Impact damage where something struck the structure — a tree on a roof, a vehicle into a wall, debris through a wall assembly
- Damage to anything that was carrying load: a column, a post, a bearing wall, a truss, a joist, a header
- Water that has reached structural framing, or has been standing against a foundation
- Damage to an agricultural or industrial building, a mezzanine, or any structure supporting equipment or machinery
- A claim that has been denied or disputed, where an independent engineering opinion is needed
- Any case where a building department, an insurer or an attorney has asked for an engineer’s report
A general contractor can tell an owner how a repair would be carried out. A licensed structural engineer addresses a different question: what the damage has done to the structure, what caused it, and what the repair actually needs to accomplish. On anything load-bearing, the second question should be answered before the first.
What a Structural Evaluation Involves
The principal engineer at Curva Consultants holds Wisconsin PE License No. 47224 and a master’s degree in civil engineering with a structural focus from the University of Wisconsin–Madison. A storm damage evaluation generally involves a site visit to observe and measure the conditions directly, a review of whatever documentation exists — the owner’s photographs, drawings if any survive, prior reports — and an assessment of how the structure is carrying load now compared with how it was intended to.
The written result describes the observed conditions, gives an opinion on cause where the evidence supports one, and sets out what the structure requires. Our firm’s forensic engineering work covers damage from natural disasters including wind, snow, rain and flooding, as well as fire damage, freeze/thaw damage, impact from vehicles and equipment, and overload assessment. You can read more about that work on our forensic engineering page.
Where a damage claim ends up contested, the principal engineer is also available for expert witness work, providing independent, documented engineering opinions. Decisions about how to pursue a claim belong with the owner’s attorney and insurer; the engineering opinion addresses the structure and the cause of the damage.
Agricultural buildings have their own version of this, because long clear spans and light framing respond differently to wind and snow than an enclosed building does. When a Wisconsin farm building needs a structural engineer covers what is worth looking at on a barn, machine shed or grain bin.
A Short Version to Keep Somewhere
If the detail above is more than anyone wants to read with a tarp on the roof, the short version is this. Make sure everyone is safe and stay out of anything that looks unstable. Photograph wide first, then close, then inside. Write down the date, the weather and what was already in poor shape. Photograph before any emergency work and keep the receipts and the removed material. Call a licensed structural engineer before repairs begin on anything that holds the building up.
Structural Engineering in Northeast Wisconsin
Curva Consultants provides structural engineering services for residential, commercial, industrial, agricultural and municipal buildings across Northeast Wisconsin, including forensic investigations and storm damage evaluation. To discuss a damaged building, call 866-455-0155 or use our contact page.
We serve clients throughout the region, including Manitowoc, Downtown Green Bay, Green Bay East, De Pere, Ashwaubenon, Suamico, Howard, Allouez, the Appleton area and the Sheboygan area.
Sep 28, 2026 | Beyond the Blueprint
Every winter in Northeast Wisconsin, roofs carry a load they were designed for on paper and then asked to hold in real life. Most of them do it without any drama. But snow is not a steady, predictable weight — it drifts, it settles, it soaks up rain, and it piles up in the places a roof is least ready for. When a roof gets into trouble in February, the reasons usually started forming in December.
This is a look at what snow load actually is, why Wisconsin roofs see conditions that many national rules of thumb do not account for, and the warning signs that are worth a call to a licensed structural engineer rather than a wait-and-see.
What Snow Load Actually Means
Snow load is one of the live loads a roof is designed to carry — a weight that changes over time, as opposed to the permanent weight of the structure itself. If that distinction is new, our article on dead load versus live load walks through how engineers separate the two and why it matters.
Building codes assign a design ground snow load to each area, and the structural engineer converts that into a roof load using factors for the roof’s slope, its exposure to wind, whether the building is heated, and how the building is used. Those values are set by code and confirmed with the local building department, so they are not a matter of opinion or a number an owner can adjust after the fact.
Here is the part that surprises people: depth is not weight. A foot of dry, fresh snow and a foot of settled, rain-soaked snow are nowhere close to the same load. Snow compacts as it sits, it absorbs meltwater and rainfall, and it refreezes. The same twelve inches on the roof in January can be carrying several times the weight it started with by the time a thaw and a refreeze have worked on it.
Why Wisconsin Winters Are Hard on Roofs
Northeast Wisconsin stacks several conditions on top of one another. Snow arrives early and often, and lake-effect bands off Lake Michigan can drop heavy accumulation on Manitowoc and the Green Bay corridor while an area an hour inland gets a fraction of it. Those bands are localized enough that two buildings owned by the same company can be carrying very different loads on the same morning.
Then the temperature swings. A stretch of days above freezing followed by a hard refreeze puts the roof through a freeze-thaw cycle that does two things at once: it densifies the snowpack that is still up there, and it moves meltwater to the cold edges of the roof, where it refreezes into ice dams at the eaves and around gutters. Water that backs up behind an ice dam finds its way into the roof assembly, and the ice itself adds concentrated weight right at the perimeter.
Late-winter rain on top of an existing snowpack is a condition engineers watch closely. The snow acts like a sponge, holds the rainfall instead of shedding it, and the roof picks up the weight of both. If the drains or scuppers on a flat roof are frozen shut, that water has nowhere to go at all.
Drifting Snow Is the Part People Miss
An even blanket of snow across a roof is usually not what causes a problem. Wind redistributes it, and the resulting uneven load is often the condition that governs the design.
Snow drifts and piles up in predictable places:
- Against parapet walls along the downwind edge of a flat roof
- At roof steps, where a lower roof meets a taller wall — the lower section can carry a deep drift while the upper roof stays nearly clear
- In valleys where two sloped roof planes meet
- Behind rooftop mechanical units, screens, and solar racking
- Against additions and canopies built later than the original structure
That last one deserves attention. When a building gets an addition, a new canopy, or a rooftop unit added years after it was built, the original roof suddenly has a drift condition that nobody designed it for. This is a common reason an older building ends up needing a structural review — the structure itself is sound, but the loading picture changed and the drawings were never revisited.
Warning Signs Worth Taking Seriously
A roof under stress usually says something before anything dramatic happens. Inside the building, watch for:
- New sagging or a visible dip in a ceiling line, especially mid-span
- Interior doors or windows that suddenly stick or will not latch
- New cracks in drywall or plaster near bearing walls, or at the corners of door frames
- Creaking, popping, or cracking sounds that are new this winter
- Sprinkler heads, ceiling grid, or light fixtures that have started pushing down or pulling away
- Visible deflection or bowing in exposed beams, joists, or purlins in a warehouse or shop space
- Water staining that appears mid-winter rather than during rain
If any of those show up while there is significant snow on the roof, treat it as urgent. Get people out of the area, and if there are signs of active movement, call 911 and your local fire department before anything else. An engineering assessment comes after the building is clear, not instead of clearing it.
One more note, because it comes up every year: clearing snow off a roof is hazardous work, both for the person doing it and for the roof. Taking snow off unevenly can leave the structure with a worse unbalanced load than it started with. That work belongs with a qualified roofing or snow-removal contractor, not a property owner on a ladder.
When a Licensed Engineer Should Look at a Roof
Not every winter question needs an engineer. These situations generally do:
- Any of the warning signs above. A structural assessment tells you whether what you are seeing is cosmetic or a capacity problem.
- A planned addition, rooftop unit, or solar array. New equipment changes both the permanent load and the drift pattern. The calculations that support a permit are covered in our article on what structural drawings and calculations a building permit needs.
- An older building with no drawings on file. Plenty of buildings in Manitowoc and Green Bay predate the records anyone still has. Determining the existing capacity takes a field assessment and calculations, not a guess.
- A change of use. A building repurposed from storage to assembly, manufacturing, or retail is held to different requirements, and the roof is part of that review.
- After a heavy season. If a roof visibly struggled last winter, an assessment before the next one gives you something to act on while the weather still allows work.
An assessment produces a written structural opinion from a licensed engineer: what was observed, what the analysis shows, and what the options are. The principal engineer at Curva Consultants holds Wisconsin PE License No. 47224 and an MS in Civil (Structural) Engineering from UW-Madison, and provides structural assessments and analysis for buildings across Northeast Wisconsin.
If a Roof Has Already Been Damaged
When damage has already happened, the questions change. What failed, why it failed, and what the condition of the rest of the structure is are all separate from the repair itself — and they usually need to be answered before repair decisions get made. Before any of that, the owner’s own record of the damage matters more than it looks like it does at the time — what to photograph and write down after storm damage is worth reading before cleanup starts.
Our firm provides forensic structural engineering for exactly this, including snow and freeze/thaw damage evaluation and overload assessment: documenting the condition, analyzing the cause, and putting an independent engineering opinion in writing. Building owners often bring in their own engineer alongside an insurance review, and the principal engineer is also available for expert witness work if a matter later becomes a dispute. Curva Consultants is not a claims adjuster and does not decide coverage — the work is the engineering analysis, and decisions about a claim stay with the owner, their adjuster, and their attorney.
Common Questions
How much snow is too much for a roof?
There is no single depth that answers this, because weight depends on how dense the snow is and how it is distributed. A roof’s capacity comes from its design snow load and its actual condition, which is why an assessment looks at the structure rather than at a number on a tape measure.
Do flat roofs handle snow worse than pitched roofs?
Not inherently — both are designed for the loads they are expected to carry. Flat and low-slope roofs do hold snow rather than shedding it, and they depend on drains and scuppers staying clear, so they are more sensitive to rain-on-snow and to blocked drainage.
My building is older. Was it designed for today’s snow loads?
It may not have been. Code requirements have changed over time, and older buildings were sometimes altered without the roof loading being reviewed. That does not mean the building is unsafe, but it does mean the capacity should be determined rather than assumed.
Do ice dams cause structural problems, or just leaks?
Most often they cause water intrusion, which damages insulation, finishes, and over time the roof deck and framing. The ice itself also concentrates weight at the eaves. Repeated seasons of it can turn a water problem into a structural one.
Can you assess a roof in the middle of winter?
Yes. Winter conditions limit what can be seen on the roof surface, but the interior assessment, the framing review, and the load analysis can all move forward. When something is actively concerning, waiting for spring is not the right call.
Structural Engineering in Northeast Wisconsin
Curva Consultants provides structural assessments, inspections, design, and forensic engineering for residential and commercial buildings throughout Northeast Wisconsin. If you have a question about a roof heading into this winter, call 866-455-0155 or use the contact page.
Service areas: Manitowoc · Downtown Green Bay · Green Bay East · De Pere · Ashwaubenon · Suamico · Howard · Allouez · Appleton area · Sheboygan area
Related reading: what to expect from a structural engineer inspection · projects and services
Sep 21, 2026 | Beyond the Blueprint
Most building problems get settled with a phone call. The contractor comes back, the insurer pays the claim, the owner and the tenant work it out. Sometimes they do not. When the people involved disagree about why something cracked, sagged, leaked or failed, and money depends on the answer, a structural engineer is often brought in to give an independent opinion. When that opinion may be used in a dispute, the engineer is serving as an expert witness.
This is a plain-language look at what that role involves, when it tends to come up, and what helps the engineer do the job well.
What an expert witness structural engineer does
An expert witness is someone with specialized training who is asked to explain technical facts to people who do not have that training — attorneys, insurance representatives, mediators, arbitrators, and sometimes a judge or jury. In a building dispute, the questions are usually structural ones:
- What actually caused the damage?
- Was the structure designed and built the way the drawings and the building code called for?
- Was the damage there before a certain date, or did it start after?
- Is what happened consistent with a storm, an impact, an overload, or long-term movement?
- What does a proper repair need to include?
The engineer’s job is to answer those questions from the evidence, explain the reasoning in writing, and be able to walk through that reasoning clearly if asked. The job is not to argue anyone’s side. An engineering opinion only carries weight if it follows the evidence, regardless of who retained the engineer.
When a dispute needs a structural engineer
Not every disagreement about a building needs an engineer. These are the situations where one is commonly brought in:
- Construction defect disputes. An owner believes something was built wrong. A contractor believes it was built to the drawings. Someone has to compare what is in the field against what was designed and what the code requires.
- Contested insurance claims. The owner and the carrier disagree about the cause or extent of structural damage — for example, whether roof damage came from a snow event or from years of gradual deterioration. There is more on the claim side in our article on hiring your own structural engineer for an insurance claim.
- Impact damage. A forklift, crane or vehicle strikes a building, and the parties disagree about what was damaged and what the repair should be.
- Overload questions. A floor, mezzanine or roof was loaded beyond what it was designed for, and the question is who knew and when.
- Property transactions. A buyer discovers a structural problem after closing and the question becomes whether it existed, and was visible, beforehand.
- Landlord and tenant disagreements over who is responsible for structural damage in a leased space.
Curva Consultants works with building owners, insurance carriers, contractors and attorneys. The principal engineer is available for expert witness engagements involving structural damage, failures and construction disputes, including litigation support.
Consulting first, testifying only if needed
Many engineering engagements in a dispute start as consulting work. An attorney or owner asks the engineer to look at the damage, review the documents, and explain what happened — privately, before anyone decides how to proceed. Sometimes that review shows one side’s position is weak and the matter settles. Sometimes it shows the question is closer than anyone thought.
Only some of these engagements ever reach a stage where the engineer’s opinion is formally presented. How the engineer is retained, and in what role, is a decision for the attorney handling the matter. It shapes what gets written down and when, so it is worth settling at the start.
How the investigation works
The engineering side of a dispute follows the same basic path as any forensic engineering investigation:
- Document review. Drawings, specifications, permit records, inspection reports, change orders, photos, repair invoices, and any earlier engineering reports.
- Site observation. A visit to see the conditions first-hand, measure, photograph, and note anything the documents do not show.
- Analysis. Checking what the structure was designed to carry against what it was actually asked to carry — and comparing the damage pattern to the causes being argued about. Different causes leave different patterns.
- A written report. The findings, the reasoning, and the opinion, laid out so someone without an engineering background can follow it.
A good report separates what was observed from what was concluded, and says plainly where the evidence is limited. That candor is part of what makes an opinion credible.
What to do before the engineer arrives
The most useful evidence is often lost in the first few weeks, before anyone realizes the matter will be contested. If a dispute looks likely:
- Photograph everything as it is now, with dates, from wide shots down to close-ups. Only do this from areas that are safe to be in.
- Keep failed or removed components — a cracked beam, a sheared connector, a section of damaged decking — rather than hauling them away with the debris.
- Talk to your attorney and your insurer before permanent repairs. Temporary shoring or weather protection is often necessary for safety, but covering up or replacing damaged structure can remove the evidence everyone will later need to see.
- Gather the paperwork: drawings, contracts, permits, inspection records, and any correspondence about the problem.
If you are unsure whether a damaged structure is safe to be near, keep people out and have it evaluated first. Safety comes before documentation.
Structural disputes in northeast Wisconsin
The climate here shapes what gets argued about. Heavy snow and drifting — especially where a lower roof sits against a taller wall — puts real demand on roof framing, and the question after a failure is often whether the roof was designed for the load it saw. Repeated freeze-thaw cycles work on masonry, concrete and foundations over time, which can make it hard to tell sudden damage from gradual wear. Clay soils and a high spring water table in parts of the region contribute to foundation movement that can look alarming but may or may not be structural. Our article on when a foundation crack is cosmetic versus a structural problem covers that distinction, and dead load versus live load explains the loads a structure is designed around.
Telling these causes apart is exactly the kind of question an independent engineering review exists to answer.
Credentials that matter
An engineering opinion is only as useful as the qualifications behind it. The principal engineer at Curva Consultants holds Wisconsin PE License No. 47224 and a Master of Science in Civil (Structural) Engineering from the University of Wisconsin–Madison. Those credentials are listed on the forensic engineering page.
Working with Curva Consultants
Curva Consultants provides forensic structural investigation, insurance claim support and expert witness services across northeast Wisconsin, alongside structural design for residential, commercial, industrial and municipal projects. Offices are in Green Bay and Manitowoc, serving downtown Green Bay, Green Bay East, Manitowoc, De Pere, Ashwaubenon, Allouez, Howard, Suamico, the Appleton area and the Sheboygan area.
If the question starts with an existing building rather than a dispute, see what to expect from a structural engineer inspection.
To discuss an expert witness or investigation engagement, get in touch or call 866-455-0155. A full list of services is on the structural engineering services page.

Sep 14, 2026 | Beyond the Blueprint
If you have applied for a building permit and the plan reviewer handed the application back asking for “engineered drawings” or “stamped calculations,” you are not being singled out. It is a routine request, and it usually means the project has reached a point where someone with a professional engineering license has to put their name on how the building will carry its loads.
This is a plain-language walk-through of what that request actually means, what ends up in the package, and how to get through it without the project sitting still.
What a building department is really asking for
A building permit application is a request to be allowed to build something. The plan reviewer’s job is to confirm that what you are proposing will stand up, hold what you plan to put on it, and handle the snow, wind and use it will see over its life.
For a lot of everyday work, the code has prescriptive tables that cover it. Standard joist spans, standard headers over standard openings. A contractor can point at the table and the reviewer can check it.
The moment a project steps outside those tables, the tables stop answering the question. That is when the reviewer asks for structural drawings and calculations prepared by a licensed engineer. It is not a judgment about your contractor’s work. It is that the code has run out of pre-approved answers and someone has to do the math for your specific building.
What goes in the drawing set
“Structural drawings” is shorthand for the sheets that show how the building holds itself up, as opposed to the sheets that show where the cabinets go. Depending on the project, that can include:
- A foundation plan — footing sizes and depths, wall thicknesses, reinforcing, and how the new work ties into anything existing.
- Framing plans — floor by floor, showing every beam, column, joist and header, with sizes and spacing called out.
- A roof framing plan — trusses or rafters, bearing points, and how the roof loads get down to the foundation.
- Sections and details — close-up drawings of the connections. Where a beam lands on a post, how a new header ties into old framing, how a column is anchored. Connections are where most of the real engineering lives.
- A general notes sheet — the design loads used, the material strengths assumed, and the standards the design was built on. This is the sheet the plan reviewer reads first.
The set does not have to be thick. It has to be complete enough that a reviewer can follow the loads from the roof to the soil, and complete enough that the crew in the field can build exactly what was designed.
What the calculations are doing
The drawings say what to build. The structural calculations are the written proof that those sizes work. In Wisconsin the loads that usually drive the answer are:
- Dead load — the permanent weight of the building itself. Framing, sheathing, roofing, flooring, drywall.
- Live load — the weight of what goes in and on it. People, furniture, inventory, equipment.
- Snow load — what accumulates on the roof, including drifting where a lower roof meets a taller wall. In this part of the state it is often the number that governs the roof design.
- Wind load — pressure pushing on the walls and lifting on the roof, and the uplift connections that resist it.
- Seismic and lateral — how the building resists being pushed sideways and stays square.
Each structural member gets checked against the combination of those loads that is hardest on it. The calculation shows the demand, the capacity, and the margin between them. When a plan reviewer questions a beam size, the calculation is the answer.
What the stamp means
A stamped drawing carries the seal and signature of a licensed professional engineer. In Wisconsin that is a state-issued license held by a person, not a company. The principal engineer at Curva Consultants holds Wisconsin PE License No. 47224.
The stamp is a statement that a licensed engineer prepared or directly supervised the design and takes professional responsibility for it. That is why a building department will accept a stamped drawing instead of a code table: the responsibility has a name attached to it.
It also means the engineer has to be satisfied before it gets sealed. If something in the design does not work, it gets resolved before the stamp goes on, not after.
Projects that usually need engineered drawings
Every municipality writes its own submittal requirements, so the only authoritative answer comes from the building department handling your permit. That said, these are the situations that commonly trigger the request:
- Taking out a wall. If it is carrying load, something has to carry it instead, and the new beam and its posts have to be sized and detailed.
- Additions. New structure tying into old structure, often on new footings next to existing ones. There is more on this in our guide to structural considerations for home additions and renovations.
- Large or unusual openings — wide sliders, garage door widenings, open-concept spans that no standard header table covers.
- Change of use. Turning a warehouse bay into a gym, or an office into a restaurant, changes the live load the floor has to carry even if nothing structural is being moved.
- Mezzanines and equipment platforms, and any machinery being hung from or set on existing framing.
- Commercial and multi-story work, where prescriptive tables generally do not apply at all.
- Repairs after damage, where the existing structure has to be evaluated before the repair can be designed.
If you are not sure which bucket your project falls in, a short conversation before you submit is usually enough to tell.
How to keep the permit moving
The delays we see most often are not engineering problems. They are missing information. Having these in hand at the start makes a real difference:
- Your architectural plans, even if they are preliminary. Dimensions and layout drive everything downstream.
- Measurements of what is already there for work on an existing building — joist sizes and direction, spans, wall locations, what the foundation looks like.
- The actual weight of anything unusual going in. Equipment cut sheets, tank capacities, rack loading. Guessing here almost always means redesigning later.
- Your municipality’s submittal checklist. They differ, and the checklist tells the engineer exactly what the reviewer expects to see.
- Any plan review comments you have already received. If a reviewer has written down what is missing, that is the most direct starting point.
What happens if the drawings are skipped
The permit does not get issued, which is the simplest version of the problem. The harder version is work that goes ahead without them: an inspector can require finished work to be opened back up so the structure underneath can be seen, and anything that does not check out has to be corrected before the project can move on.
Getting the structural work documented before the walls close up is a far smaller job than sorting it out afterward.
Working with Curva Consultants
Curva Consultants prepares structural drawings and calculations for permit submittal across northeast Wisconsin, working in wood, steel, concrete and masonry on residential, commercial, industrial and municipal projects. Offices are in Green Bay and Manitowoc, with regular work in De Pere, Ashwaubenon, downtown Green Bay and the surrounding communities.
If the project starts with a question about an existing building rather than a new design, that is a different first step — see what to expect from a structural engineer inspection. If damage is involved, forensic engineering and damage investigation is the starting point, and hiring your own structural engineer for an insurance claim covers how that works alongside a claim.
To get drawings and calculations started for a permit submittal, get in touch or call 866-455-0155. A full list of services is on the structural engineering services page.